Achieving peak performance requires more than just effort—it demands precision and understanding. The Olympiatoppen Intensity Scale (I-scale) is a powerful tool that divides training intensity into eight zones, offering a structured framework to optimize your training. This guide dives deep into the I-scale, its scientific basis, and practical applications, with specific workouts for orienteers included at the end.
What is Olympiatoppen’s Intensity Scale?
The I-scale is designed to help athletes and coaches monitor, plan, and evaluate training intensity. It uses a combination of internal and external metrics, such as heart rate (HR), perceived exertion (RPE), lactate levels, power output, and speed. These parameters allow for a comprehensive understanding of effort and its impact on the body, enabling fine-tuned adjustments to training.
The scale is divided into eight zones (I-1 to I-8), each associated with specific physiological adaptations, ranging from building endurance to developing anaerobic power. It’s a dynamic model meant to be customized for individual needs based on sport, fitness level, and goals.
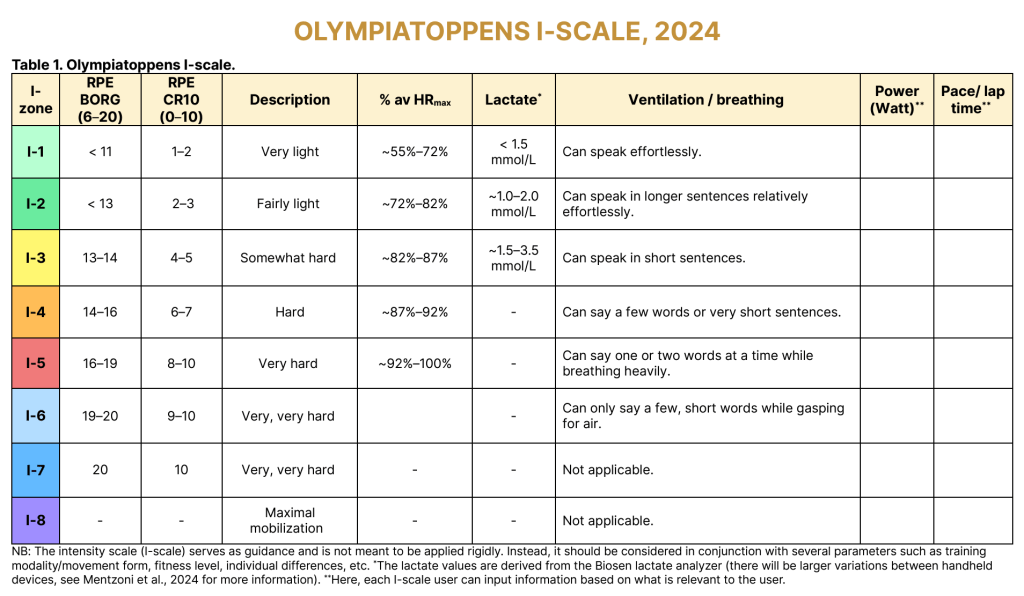
The Eight Intensity Zones
Zone 1 (I-1): Very Light (RECOVERY)
- Description: Very easy, low effort. Breathing is steady, and you can hold a conversation effortlessly.
- Metrics: ~55-72% HRmax, ~0.5–1.0 mmol/L lactate, RPE 1-2.
- Goal: Recovery, maintaining an aerobic base.
- Duration: Can be sustained for hours.
Zone 2 (I-2): Light (ENDURANCE)
- Description: Slightly more effort, but still comfortable. You can speak in long sentences.
- Metrics: ~72-82% HRmax, ~1.0–2.0 mmol/L lactate, RPE 2-3.
- Goal: Develops aerobic endurance and fat metabolism.
- Duration: 1-3 hours for most endurance athletes.
Zone 3 (I-3): Moderate (LOW THRESHOLD)
- Description: Noticeable effort; breathing deepens. You can only speak in short sentences.
- Metrics: ~82-87% HRmax, ~1.5–3.5 mmol/L lactate, RPE 4-5.
- Goal: Improves aerobic capacity and strengthens lactate threshold.
- Duration: 30-90 minutes.
Zone 4 (I-4): Hard (HIGH THRESHOLD)
- Description: Hard work; breathing becomes labored. You can only say a few words.
- Metrics: ~87-92% HRmax, lactate levels vary, RPE 6-7.
- Goal: Enhances VO2max and the ability to sustain high intensity.
- Duration: 20-50 minutes, typically done in intervals.
Zone 5 (I-5): Very Hard (VO2MAX)
- Description: Very challenging; speaking is nearly impossible.
- Metrics: ~92-100% HRmax, high lactate levels, RPE 8-10.
- Goal: Builds anaerobic capacity and improves speed endurance.
- Duration: 10-30 minutes in short intervals.
Zone 6 (I-6): Maximal Effort
- Description: All-out effort, leaving you gasping for air.
- Metrics: Lactate spikes quickly; HRmax is not a key measure here, RPE 9-10.
- Goal: Develops anaerobic power and lactate tolerance.
- Duration: 2-10 minutes, typically broken into short sprints or bursts.
Zone 7 (I-7): Sprint Efforts
- Description: Short, maximum-intensity sprints.
- Metrics: Purely anaerobic; lactate levels peak post-effort.
- Goal: Improves sprint capacity and neuromuscular coordination.
- Duration: 15-60 seconds per effort.
Zone 8 (I-8): Explosive Mobilization
- Description: Short, explosive bursts of maximal effort.
- Metrics: Maximal exertion, typically unmeasurable beyond RPE.
- Goal: Focuses on raw power and speed.
- Duration: 3-15 seconds per interval.
How to Use the I-Scale
- Plan Sessions with Purpose
Align training intensity with your goals, whether building endurance, improving speed, or recovering. - Monitor Intensity Dynamically
Use a mix of internal (RPE, HR) and external (speed, lactate) metrics for real-time feedback. - Evaluate and Adjust
After each session, reflect on performance and recovery to adjust your plan as needed. - Log Training
Record time spent in each zone to track progress and refine training distribution.
Practical Orienteering Workouts in Each Zone
Zone 1 (I-1): Active Recovery in Terrain
- Workout: 60-90 min light jog or walk in a forest, focusing on route-choice visualization.
- Why: Combines recovery with mental preparation.
Zone 2 (I-2): Long Navigation Session
- Workout: 60-150 min of continuous running in forest terrain with map-reading focus. Multitechnique workouts are good here.
- Why: Builds endurance while practicing technical navigation.
Zone 3 (I-3): Threshold Training
- Workout: 3 x 15 min loops in a technical terrain, maintaining consistent effort.
- Why: Enhances your ability to sustain race pace while navigating, and work on the routines.
Zone 4 (I-4): Middle-Distance Intervals
- Workout: 5 x 6 min high-intensity loops on a moderately technical map with 3 min recovery jogs.
- Why: Improves high-intensity navigation skills and fitness.
Zone 5 (I-5): Race-Pace Simulation
- Workout: 8 x 3 min intervals in a not-too-technical terrain, balancing between navigation and speed.
- Why: Prepares for bursts of effort during critical race moments.
Zone 6 (I-6): Short Burst Navigation
- Workout: 10 x 45-second sprints on a sprint map, focusing on sharp turns and controls.
- Why: Develops quick decision-making under fatigue.
Zone 7 (I-7): Maximal Sprint
- Workout: 6 x 30-second sprints with map handoffs between efforts.
- Why: Builds explosive speed for decisive finishes.
Zone 8 (I-8): Start Practice
- Workout: 10 x 10-second maximal starts from a marked point, focusing on map orientation and finding the triangle.
- Why: Enhances explosive power and navigation under pressure.
Further Reading
- Scherr et al. (2013): Associations between Borg’s RPE and physiological measures.
- Arney et al. (2019): Comparing RPE scales in exercise contexts.
- Seiler (2010): Training intensity distribution in endurance sports.
By mastering the Olympiatoppen Intensity Scale and tailoring it to your training, you can achieve optimal performance while reducing the risk of burnout. Use these principles to train smarter, not just harder, and unleash your true potential.
Discover more from Orienteering Coach
Subscribe to get the latest posts sent to your email.

2 thoughts on “Unleashing Your Potential: 📊 Decoding Olympiatoppen’s Intensity Scale”